月度归档:2015年03月

腾讯CDN节点入驻中国移动西藏公司IDC机房

话说这个周末,有一个非常非常火的视频在麦朵的朋友圈广为流传,这就是藏族美女唱的藏语版《喜欢你》。如何在腾讯视频上先睹为快呢?

这不,咱麦朵家同事们又为大家带来了福利——就在不久前,中国移动西藏公司率先在IDC机房完成腾讯CDN部署,节点已存储腾讯热点视频、音乐等流媒体类业务50万个存储量100T

存储包括QQ空间、页游、游戏官网等产品的图片、flash、js等静态资源全量文件,文件存储量10T,腾讯CDN部署完成后以2Gbps的流速服务西藏移动用户访问腾讯业务。

现在由麦朵给大家来解读一下腾讯CDN入驻咱家IDC机房过程吧。

中国移动西藏公司IDC机房是什么

IDC是互联网数据中心(Internet Data Center)的简称是电信运营商利用已有的互联网通信线路、带宽资源,建立标准化的电信专业级机房环境,为政府、企业提供服务器托管、租用以及相关增值等方面的全方位服务。

中国移动西藏公司IDC机房建于2009年,按国家标准A类机房设计建设。目前,企信通、集团号簿、天上西藏、移动互联网电视等自有业务已入驻IDC机房。

腾讯CDN服务是什么

CDN的全称是Content Delivery Network,即内容分发网络。将网站的内容发布到最接近用户的网络”边缘”,使用户可以就近取得所需的内容,提高用户访问网站的响应速度。

腾讯CDN入驻中国移动西藏公司IDC机房,会为我们带来什么好处呢?

当我们移动用户使用移动网络观看已存储到本地腾讯视频、QQ音乐、腾讯直播时,会更快更顺畅。能够更快地打开QQ空间、页游、游戏官网中的图片、flash资源文件。用户感知将明显提升。

当一个文件点击率很高的会被热点文件,腾讯CDN系统将自动缓存此文件。当下一位用户点击后,就可以通过本地CDN进项访问,能更快速响应用户,使用户感知更好

2014年Q4全球平均网速4.5Mbps移动数据流量同比增长54%-Akamai提供

Akamai发布了《2014年第四季度互 联网发展状况报告》。其报告是利用Akamai Intelligent Platform智能平台采集的数据分析得出,对诸如固定及移动网络连接速度与宽带采用率、总体数据流量等情况进行了深度分析。

注释:Akamai是全球最大的CDN服务商,它巨大的网络分发能力在峰值时可达到21Tbps。Akamai公司旨在消除Internet瓶颈和提高互联网用户访问体验,保护最终用户访问网站以及企业内部应用的速度,并且提供全面的云安全服务,提供全球高清流媒体的加速。

3e25b70145f5f2c

从2014年第四季度的数据来看,全球平均网速增长到4.5Mbps,同比增长20%;全球移动数据流量同比增长54%。以上数据来源于Akamai的最新报告。Akamai公司调查132个国家后发现绝大多数国家的网速比同期都有所增长,摩洛哥增长幅度最低仅为0.3%,达到2.4 Mbps;而增幅最大的是刚果,同比增长146%,达到1.3 Mbps。只有极个别的国家的网速是下降的,在苏丹网速就由1.4 Mbps降到1.0 Mbps。

正如下表所示,给出了排名前十位的国家或地区,其中有8个国家实现了两位数的年增长率,而只有6个国家实现环比增长。

6bc7e9f2f7797e4

全球宽带(>4 Mbps)使用率达到了59%,同比上一季度下滑0.7%,相比较于2013年增长20%。全球高速宽带(>10 Mbps)使用率比上一季度增长2.9%,相比较于2013年增长25%。

在2010年,美国FCC重新定义了宽频:把2010年设立的下载4Mbps、上传1Mbps的宽频标准提高到下载25Mbps与上传3Mbps,FCC选择25Mbps的理由首先是25Mbps是4K Ultra HD网络视频所要求的速率。

“美国是首个把标准调到如此之高的国家,鉴于升级的考量,我们日后就需要考虑如何在报告中表述,因为数据的统计标准也是随之变化的。”David Belson,国家互联网报告负责人在接受采访时表示。等到2015年第一季度数据出来时,围绕着它就会有不同的定义,尽管本质上都是相同的数据。

145dbe7d43f41ee

在以前的报告中,Akamai同时也给出了移动数据流量的统计情况。2014年第四季度全球互联网的平均移动连接速度介于最低1.0 Mbps与最高16.0Mbps之间。

2015亚太CDN峰会-帝联、网宿、Akamai、快网等CDN厂商、华为中兴腾讯阿里IT领袖等一起演绎CDN峰会

由DVBCN数字电视中文网主办的以“合理建设大数据背景下的流量运营机制”为主题的2015亚太CDN峰会将于3月30-31日在北京燕莎中心凯宾斯基饭店盛大召开。众多的CDN行业“大佬”将齐聚北京,共同为行业的发展出谋献策。现在就让我们来看看有哪些嘉宾会出席此次峰会吧!


1、广电总局科技委主任杜百川

QQ截图20150323234022.jpg


杜百川先生是现任国家新闻出版广电总局科技委副主任,国家信息化专家咨询委员会专家。曾在北京广播学院(现传媒大学)任教十余载,研究教授数字电视多年,后在广播科学研究院从事数字电视、数字声音广播和高清晰度电视研究,历任副院长、院长,国家高清晰度电视专家组组长。在2001年-2006年,杜百川先生任国家广播电影电视总局副总工、科技委副主任,国家信息化专家咨询委员会专家,国务院三网融合专家组专家,国家广播电视标准化委员会副主任,国家无线电管理委员会专家咨询委员会专家。

在2014年亚太CDN峰会上,杜百川先生曾给出广电自建CDN的6大建议,今年3月30日,他将再次来到亚太CDN峰会,为大家带来《全球CDN趋势与大数据发展趋势》主题演讲。


2、工信部电信研究院科技委主任蒋林涛

QQ截图20150323234126.jpg 

蒋林涛先生,现任工业与信息化部电信研究院科技委主任,原信息产业部电信研究院总工程师,IP与多媒体标准技术工作委员会主席。蒋林涛先生从事多媒体技术、数据通信网、IP网络技术的标准研究和设备开发工作多年,其制定的数字电视标准是国内四大标准之一。

在2015亚太CDN峰会上,蒋林涛先生将在其权威的技术领域为大家讲解《CDN接口及业务流程标准化的重要性》。


3、腾讯云商务副总经理李文涛

 QQ截图20150323234218.jpg

李文涛先生是腾讯云计算公司现任商务副总经理,全面负责腾讯云业务拓展与产业链上下游合作。此次参加2015亚太CDN峰会,李文涛先生将带来主题演讲:《CDN与云服务——迎合互联网趋势的“新武器”》。为我们介绍腾讯云CDN内部的应用案例,以及针对合作伙伴提供的解决方案。此外,他还将与大家分享腾讯云对CDN市场的看法与预测。


4、网宿科技副总裁刘洪涛

QQ截图20150323234343.jpg


刘洪涛先生是网宿科技股份有限公司副总裁,资深的CDN行业专家。曾在富士通信息系统(中国)有限公司及纳斯达克上市公司弘成教育任职,在互联网行业拥有十年的工作经验。

2013年,网宿实现公司营收12.05亿元,成为CDN行业第一,净利润2.37亿元,占据44%的市场份额。而2014年全年,网宿公司归属于上市公司股东的净利润为42680.16万元~49793.52万元,较上年同期增长80%~110%。如此高速的增长,背后是什么样的经营思路呢?刘洪涛先生将出席2015亚太CDN峰会,并带来主题演讲:《移动互联网时代的CDN新思路》。


7、乐视云CMO高沁民

QQ截图20150323234719.jpg

高沁民先生现任乐视云CMO,主要负责乐视云计算运营管理工作,具有从前端到后端的完整工作经验及在跨国公司长期的营销和运营管理背景。曾任职于Teleca、世纪互联、蓝汛,并且在蓝汛的时候曾任分管集团全球最核心的视音频事业部和运营商事业部副总裁。2015亚太CDN峰会上,凭借在视频网站的丰富管理经验,高沁民先生将为我们带来《视频网站自建CDN的现状与分析》主题演讲。


8、互动媒体产业联盟副秘书长杨崑

QQ截图20150323234804.jpg


9、华数传媒平台运维部副总经理姚军


QQ截图20150323234850.jpg


姚军先生毕业于浙江大学,现任华数传媒网络有限公司平台运维部副总经理。于2003年加入华数后,先后负责数据中心、宽带业务系统的建设与运维工作,并作为主要技术负责人之一参与设计和建设了华数互动电视系统,具有丰富的行业经验。目前主持华数自建CDN、基础架构云的规划与运营工作。

近年来,云计算和大数据引发了互联网和IT产业的第三次革命浪潮,基于高清视频流的网络视频时代正在临近。广电运营商原本在高清视频业务上有着得天独厚的优势,而4K技术的到来,使得广电CDN需要一次新的技术变革来保持传统优势。在2015亚太CDN峰会上,姚军先生就将为大家分析一下《高清化对广电运营商CDN的新挑战》。


 10、北京快网科技副总经理严波

QQ截图20150323235019.jpg


严波先生是北京快网科技有限公司副总经理,也是第三代CDN网络CloudCDN的规划者,深刻理解CDN市场及需求。自2000年投身互联网,作为第一代互联网的见证者,他熟悉中国互联网的基础网络架构,并于2005年参与组建了第二代CDN网络。在此之前,他还曾在日本川崎重工及中远川崎任主管总体设计师。

网络视频自2004年在中国兴起,至今已十余载。十年中,网络视频行业在中国迅速发展并成熟,逐步成为新闻娱乐、传媒推广、教育交流等各领域的主要传播方式。在瞬息万变的流媒体大时代下,互联网电视、秀场类互动直播等各类新兴业务均有了突飞猛进的发展。在这流媒体大时代背景下,北京快网不断推出适合各类业务形态的产品和解决方案,从而支撑起CND业务快速发展。那么这一过程中,快网究竟是如何排兵布阵的呢?3月30-31日的2015亚太CDN峰会上,北京快网科技的严波先生将作主题为《流媒体大时代下的CDN发展之路》的演讲,与大家共同分享这一段历程。


11、中国国际广播电视网络台(CIBN) 副总经理付强

QQ截图20150323235111.jpg


付强先生是中国国际广播电视网络台(CIBN) 副总经理。其2003年便进入数字媒体专业领域,组织开发过国内较早的云特征流媒体在线服务系统。2006年付强先生进入互联网电视领域,创办过国内领先的多屏互动流媒体解决方案服务企业,在国内外市场都获得了成功。2009年他开始专注于云计算、大数据与智能终端解决方案领域,在国内率先提出“媒体云”服务体系,率领团队开发了面向三网融合的多屏互动中间件与终端系统,并实现了在国内多家运营商的成功商用。

3月30日,付强先生也将作为演讲嘉宾出席2015亚太CDN峰会,为大家分享《CIBN全球CDN布局的分享与探索》。


12、阿里集团副总裁章

QQ截图20150323235159.jpg 

 章文嵩先生是阿里集团高级研究员与集团副总裁,主要负责基础核心软件研发、推进网络软硬件方面的性能优化和搭建下一代高可扩展低碳低成本电子商务基础设施。他是开放源码及 Linux内核的开发者,著名的Linux集群项——LVS(Linux Virtual Server)创始人和主要开发人员。加入阿里前,他还是TelTel首席科学家与联合创始人,曾为国防科技大学计算机学院副教授。在设计和架构大型系统、Linux操作系统、系统软件开发、系统安全和软件开发管理上有着丰富的经验。


13、美国Level3亚太区副总裁周力冲

QQ截图20150323235315.jpg


周力冲(Ricky Chau)是美国Level通信集团亚太区副总裁,于香港负责整个亚太区域的销售、业务营运及业务发展。周先生拥有多年电信行业的管理经验,涉及范围广泛,其中包括销售及市场营销、產品管理及业务发展。加入Level 3前,他曾担任环球电讯的运营商销售副总裁兼亚洲总经理。自2008年至今,周先生还一直在亚太区负责领导销售及促进国际合作的角色。

在就职于Level3之前,周先生还曾在新世界电讯、Asia Global Crossing(现Pacnet),Equant(现Orange Business Services)及Cable&Wireless(现Vodafone)担任领导职位。在本次2015亚太CDN峰会上,周先生将给大家带来的主题为《如何快速借助互联网构建国际桥梁?》的主题演讲。


14、微软中国云计算创新中心总监王枫


QQ截图20150323235404.jpg


王枫先生作为微软亚太研发集团中国云计算创新中心的资深总监,领导中心的客户技术顾问团队,负责以云计算为主导的与政府,客户,和合作伙伴的紧密连接及深入技术部沟通,支持,从而更有效地帮助他们将现有的或未来的应用软件,解决方案迁移,部署,开发在微软的云计算平台和技术上,以便加强以云计算为中心的IT生态环境。王枫先生还曾担任微软亚太研发集团上海中心的商务运营总监,及微软总部SQL Server数据库产品部门的资深项目开发管理总监。

在今年3月底的2015亚太CDN峰会上,王枫先生将凭借其在云计算技术领域的深入研究经验,同大家分析《微软云的创新及应用》。


15、阿里集团技术保障部资深经理于晓声

QQ截图20150323235503.jpg

于晓声先生是阿里集团技术保障部资深经理,他拥有十几年互联网运维经验,曾服务于新浪、百度、猎豹、阿里等互联网公司,对互联网运维有深入地的积淀与理解。并且,他对运维的基础架构设计、全流程管理、团队管理等有独到思路及丰富的经验。

在高德工作期间,于晓声先生曾有效针对节假日用户高发的产品特性制定运维方案,在为用户提供稳定的出行保障服务方面做出了突出贡献。本月底的2015亚太CDN峰会将会出现于晓声先生的身影,他将凭借多年的互联网运维经验及对用户需求的敏感嗅觉,为大家分析《如何解决移动APP的高并发及高用户体验需求》。


16、帝联科技技术副总裁姜飞

QQ截图20150323235611.jpg

姜飞先生于2005年毕业于北京大学,长期从事互联网视频应用研发和产品管理工作。自2012年加入上海帝联信息科技股份有限公司以来,其主要负责公司技术与产品管理工作,现任公司技术副总裁。2015亚太CDN峰会上,他也将出席演讲台,为大家带来独到的行业分析。


17、中国通信学会常务赵慧玲

QQ截图20150323235656.jpg

赵慧玲女士为中国通信学会常务理事。此外,她还是中国电信股份有限公司云计算研究中心主任,中国通信学会北京通信学会副理事长,中国通信标准协会网络与交换技术工作委员会主席。是现任国家十二五科技宽带网络重点专项和三网融合专项专家,MEF董事会成员。此次2015亚太CDN峰会,赵慧玲女士也将为大家带来有深度的专题演讲。


18、中兴通讯CDN总工程师尹芹

QQ截图20150323235744.jpg

尹芹女士是中兴通讯股份有限公司CDN总工程师,同时还是多媒体视讯产品总工程师,技术专家委员会委员。主要研究方向为核心网技术、云计算、内容分发网络及相关业务的解决方案和产品规划。

随着云计算技术的引入及移动互联网的快速发展,多媒体视频系统中分发的内容、用户及业务范围大大扩展。如何将内容快速准确地提供给所需用户,如何使得传统的CDN网络能适应新的业务发展需要就成了一个目前制约多媒体视频系统发展的瓶颈性因素。2015亚太CDN峰会上,尹芹女士将进行主题为《跨界的融合CDN支撑智能管道业务》的演讲,为我们介绍传统CDN向融合CDN的演进过程、融合CDN的关键技术以及能力特点。


19、国家工信部多屏接入互联网标准席组长丁中

QQ截图20150323235841.jpg

丁中博士将出席3月30-31日在北京燕莎中心凯宾斯基饭店召开的2015亚太CDN峰会,并担任大会的主持。

丁中博士是我国知名度较高的数字媒体技术和产业专家,近14年对我国数字媒体产业有认真的研究和务实的观点。其曾先后担任欧洲爱迪德及其控股公司中国区首席执行官执行董事总经理,国微技术公司总裁,茁壮网络公司总裁高级副总裁。近4年他出任工信部互动媒体产业联盟产业化工作组组长,同时也是美国格理GLG顾问公司专家团最高级别成员,为华尔街十多家投资集团担任常年中国顾问,专注TMT领域特别是数字新媒体产业。他目前担任工信部多屏接入互联网标准组联席组长,组织制定我国多格式视频设备接入互联网应用的技术规范和检测方法。


20、DVBCN&AsiaOTT总编何云峰

QQ截图20150323235937.jpg

何云峰先生是DVBCN数字电视中文网创业团队核心成员,现任DVBCN数字电视中文网总编,AsiaOTT总编,同时他还是上海众视数字科技有限公司副总经理兼技术总监。何云峰先生拥有15年的广电与互联网行业技术与市场工作经验,其中包含8年的DVBCN数字电视中文网总编工作经验,对广电网络、数字电视、互联网、音视频电子、流媒体等领域关键技术及运营模式有深刻的理解。


nginx1.6.2配ngx_cache_purge实现cdn cache服务器

nginx默认安装就会带有反向代理的功能,但想要更好的使用,还得配备frickle.com的ngx_cache_purge模块,用于清除指定URL的缓存。
引用在功能上,Nginx已经具备Squid所拥有的Web缓存加速功能、清除指定URL缓存的功能。而在性能上,Nginx对多核CPU的利用,胜过Squid不少。另外,在反向代理、负载均衡、健康检查、后端服务器故障转移、Rewrite重写、易用性上,Nginx也比Squid强大得多。这使得一台Nginx可以同时作为“负载均衡服务器”与“CDN缓存服务器”来使用.

wget http://labs.frickle.com/files/ngx_cache_purge-2.3.tar.gz
tar zxf ngx_cache_purge-2.3.tar.gz

切换到nginx目录
cd nginx-1.6.2
./configure –user=www –group=www –prefix=/usr/local/nginx –add-module=../ngx_cache_purge-2.3 –with-http_stub_status_module –with-http_ssl_module –with-http_gzip_static_module –with-ipv6
make;make install

安装完成!

安装完后在/usr/local/webserver/nginx下多了四个目录,分别是fastcgi_temp,proxy_temp,scgi_temp和uwsgi_temp。

proxy_temp这个目录用于存储临时文件,需要看下是否www有权限写入,如果不可写,无法在这个目录生成文件的话,会导致反向代理失败。也可以在nginx的配置里设置proxy_temp_path指定存储临时文件的目录。

nginx配置文件参考:

http {
    #proxy_temp_path   /www/proxy_temp;
    #设置Web缓存区名称为cache_one,内存缓存空间大小为100MB,1天没有被访问的内容自动清除,硬盘缓存空间大小为10GB。
    proxy_cache_path  /www/proxy_cache  levels=1:2   keys_zone=cache_one:100m inactive=1d max_size=10g;
  
     server {
        listen       80;
        server_name  s.9enjoy.com;

            location / {
            proxy_cache cache_one;
            proxy_cache_valid  200 304 12h;
            proxy_cache_key $uri$is_args$args;
            proxy_set_header Host  $host;
            proxy_set_header X-Forwarded-For  $remote_addr;
            proxy_pass http://www.9enjoy.com;
            expires      1d;
                }

            location ~ /purge(/.*) {
                allow              all;
                allow               127.0.0.1;
            #    deny               all;
                proxy_cache_purge cache_one $1$is_args$args;
            }
            access_log /www/logs/s.log access;
        }
    ……
}

这样访问s.9enjoy.com/images/logo.gif,反向代理就会去请求http://www.9enjoy.com/images/logo.gif,保存在内存中,然后输出。
如果logo.gif这个文件发生了变化,则需要刷新缓存,访问s.9enjoy.com/purge/images/logo.gif,就会提示:Successful purge

Key : /images/logo.gif 
Path: /www/proxy_cache/39aaa70038997e0e5e77beaa4392848d
如果这个文件没有被缓存过,则提示:404 Not Found

————————————————————————————————————————-
如果是已经安装过nginx了,请一定注意,使用nginx -s reload重启是无效的!一定要-s stop之后再启动,这样才会使用新版本的nginx!

我今天就没注意这点,在这上面化了N个小时!

/usr/local/webserver/nginx/sbin/nginx -V       
nginx version: nginx/1.6.2
built by gcc 4.4.7 20120313 (Red Hat 4.4.7-11) (GCC) 
TLS SNI support enabled
configure arguments: –user=www –group=www –prefix=/usr/local/nginx –add-module=../ngx_cache_purge-2.3 –with-http_stub_status_module –with-http_ssl_module –with-http_gzip_static_module –with-ipv6

一直以为是装成功了,但反复测试均清除失败,很郁闷!明明开启了访问日志,日志也没记录任何信息!
晚上继续测试时,在nginx_error.log里看到有如下的错误提示:
2011/05/11 21:23:40 [emerg] 20976#0: unknown directive “proxy_cache_purge” in /usr/local/webserver/nginx/conf/nginx.conf:481

才确认这个模块跟本没装上,当然不能用了。后来在一个论坛看到一个人的回复说要restart,但reload是无效的。才想到前段搞nginx升级时就发现,如果不用make upgrade升级,重新编译升级的话,必须停掉,再启动才会使用新的版本!

server配置文件:注意purge的location需要处于被缓存的内容的location的前面,否则会被匹配拦截,无法准确匹配到purge!
刷新缓存办法:
wget -S -O /dev/null –header=”host:www.dnsdizhi.com”  http://127.0.0.1/purge/ngx_cache_purge.html
返回200就是刷新缓存了,
wget -S -O /dev/null –header=”host:www.dnsdizhi.com”  http://127.0.0.1/ngx_cache_purge.html 看看是不是更新了?

更加详细配置说明参考:

server {
listen 80;
server_name zhang.ge;
#缓存清理模块
location ~ /purge(/.*) {
allow 127.0.0.1;
allow 192.168.1.101; #此处表示允许访问缓存清理页面的IP
deny all;
proxy_cache_purge cache_one $host$1$is_args$args;
}
#缓存html页面,可以缓存伪静态【这是亮点!】
location ~ .*\.html$ {
proxy_pass http://127.0.0.1:8080;
proxy_cache_key $host$uri$is_args$args;
proxy_redirect off;
proxy_set_header Host $host;
proxy_cache cache_one;
#状态为200、302的缓存1天
proxy_cache_valid 200 302 1d;
#状态为301的缓存2天
proxy_cache_valid 301 2d;
proxy_cache_valid any 1m;
#浏览器过期时间设置4小时
expires 4h;
#忽略头部禁止缓存申明,类似与CDN的强制缓存功能
proxy_ignore_headers “Cache-Control” “Expires” “Set-Cookie”;
#在header中插入缓存状态,命中缓存为HIT,没命中则为MISS
add_header Nginx-Cache $upstream_cache_status;
}
#图片缓存设置,如果不是使用了Nginx缩略图功能,这个可以不用,效果不明显
location ~ .*\.(gif|jpg|png|css|jsico)(.*) {
proxy_pass http://127.0.0.1:8080;
proxy_cache_key $host$uri$is_args$args;
proxy_redirect off;
proxy_set_header Host $host;
proxy_cache cache_one;
proxy_cache_valid 200 302 30d;
proxy_cache_valid 301 1d;
proxy_cache_valid any 1m;
expires 30d;
proxy_ignore_headers “Cache-Control” “Expires” “Set-Cookie”;
add_header Nginx-Cache $upstream_cache_status;
}
#动态页面直接放过不缓存
location ~ .*\.(php)(.*){
proxy_pass http://127.0.0.1:8080;
proxy_set_header Host $host;
proxy_set_header X-Real-IP $remote_addr;
proxy_set_header X-Forwarded-For $proxy_add_x_forwarded_for;
}
#设置缓存黑名单,不缓存指定页面,比如wp后台或其他需要登录态的页面,用分隔符隔开
location ~ ^/(wp-admin|system)(.*)$ {
proxy_pass http://127.0.0.1:8080;
proxy_set_header Host $host;
proxy_set_header X-Real-IP $remote_addr;
proxy_set_header X-Forwarded-For $proxy_add_x_forwarded_for;
}
#缓存以斜杠结尾的页面,类似于CDN的目录缓存,如果存在问题请取消缓存机制
location ~ ^(.*)/$ {
proxy_pass http://127.0.0.1:8080;
proxy_redirect off;
proxy_cache_key $host$uri$is_args$args;
proxy_set_header Host $host;
proxy_cache cache_one;
proxy_cache_valid 200 302 1d;
proxy_cache_valid 301 1d;
proxy_cache_valid any 1m;
expires 1h;
proxy_ignore_headers “Cache-Control” “Expires” “Set-Cookie”;
add_header Nginx-Cache $upstream_cache_status;
}
location / {
proxy_pass http://127.0.0.1:8080;
proxy_set_header Host $host;
proxy_set_header X-Real-IP $remote_addr;
proxy_set_header X-Forwarded-For $proxy_add_x_forwarded_for;
}
}

设置http响应头Cache-Control及Pragma,增加CDN cache命中率

最近在折腾CDN cache命中率。然后就发现在伪静态环境下,cdn缓存命中率非常低,一番折腾后发现如果源站的http头部包含一些不缓存的信息,那么CDN”也许“会相应的继承源站发出的HTTP状态。
通常喜欢用军哥LNMP安装包的朋友会发现,在动态及伪静态的环境中,HTTP头部信息会包含Cache-Control: no-store,no-cache,must-revalidate,post-check=0,pre-check=0 和 Pragma: no-cache,“可能“就是这种状态影响了CDN对源站缓存的判断。

如何去掉Cache-Control及Pragma在http头部中的状态呢?
如果没有看到此文的话,你会非常痛苦的认为是网站程序本身所发出的状态,然后一番查找修改后发现依然无解,我理解这个过程,因为我就是这么干的。非常之痛苦。。。。

其实解决Cache-Control: no-store,no-cache.....和Pragma: no-cache很简单,只需修改php.ini中的session.cache_limiter参数,军哥lnmp默认值是nocache,只要修改为none即可解决这个HTTP状态中的缓存问题。耶!耶!耶!耶!耶~~~~~~~~~


session.cache_limiter = nocache

改为 

session.cache_limiter = none

重启apache

HTTP响应拆分漏洞 WASC Threat Classification解决方案

HTTP响应拆分漏洞描述:
HTTP响应拆分漏洞,也叫CRLF注入攻击。CR、LF分别对应回车、换行字符。
HTTP响应拆分漏洞危害:攻击者可能注入自定义HTTP头。例如,攻击者可以注入会话cookie或HTML代码。这可能会进行类似的XSS(跨站点脚本)或会话固定漏洞。
HTTP响应拆分漏洞解决方案:
HTTP响应拆分漏洞修复的基本思路:
限制用户输入的CR和LF,或者对CR和LF字符正确编码后再输出,以防止注入自定义HTTP头。
HTTP响应拆分漏洞-PHP语言的解决方案:
这种现象往往表现在带有参数传递的网页,只要合理的过滤好就OK啦,PHP语言的一些过滤方法:
$uuid = trim($uuid);
$uuid = strip_tags($uuid,””); //清除HTML等代码
$uuid = ereg_replace(“\t”,””,$uuid); //去掉制表符号
$uuid = ereg_replace(“\r\n”,””,$uuid); //去掉回车换行符号
$uuid = ereg_replace(“\r”,””,$uuid); //去掉回车
$uuid = ereg_replace(“\n”,””,$uuid); //去掉换行
$uuid = ereg_replace(” “,””,$uuid); //去掉空格
$uuid = ereg_replace(“‘”,””,$uuid); //去掉单引号

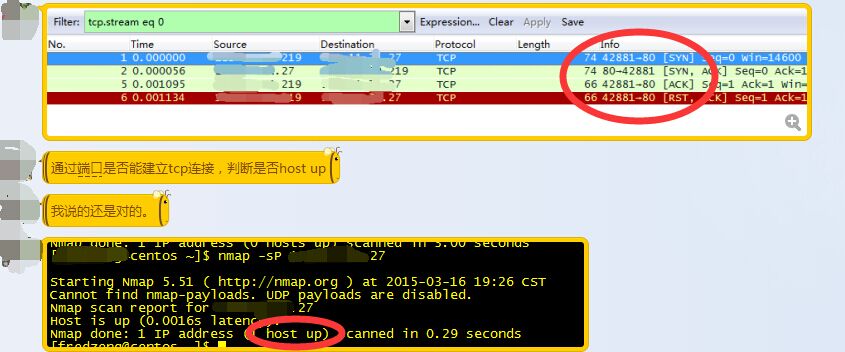
在LINUX下有什么办法防止用户使用nmap -PS扫描时主机显示为host up状态

 请教高手,在LINUX下有什么办法防止用户使用nmap -SP扫描时主机显示为host up状态?谢谢
19:16:31
【冒泡】fred@深圳 2015/3/16 19:16:31

不允许ping,关闭全部端口应该可以吧

详细看看nmap -SP测试结果,通过tcpdump抓包发现,建立tcp连接后nmap就关闭连接了。

QQ图片20150316193330.jpg

 #nmap -Pn xxx.xxx.71.27 

我们看到服务器xxx.xxx.71.27只有80端口响应了,因此可以判断xxx.xxx.71.27 host up。

QQ图片20150316194947.png

Linux 免重新编译php安装扩展(示范zip安装)

PHPExcel读取Excel表格的时候报ZipArchive library is not enabled错误. 缺少zip 模块. 在Linux下没有zip.so这个模块文件(有也不会起作用的),所以需要重新编译一下php的增加zip模块。

1)重新到原来编译php的目录

#cd php-5.3.6/ext/zip

先执行phpize

# /usr/local/php/bin/phpize

返回:Configuring for:
PHP Api Version:         20090626
Zend Module Api No:      20090626
Zend Extension Api No:   220090626

2)运行了这个zip目录下会自动生成几个文件,其中包括configure

  1. #./configure  –enable-zip –with-php-config=/usr/local/php/bin/php-config 
  2. # make
  3. # make install

3)安装完成后修改一下php.ini

  1. # vim /usr/local/php/etc/php.ini

加入

  1. extension=/usr/local/php/lib/php/extensions/no-debug-non-zts-20060613/zip.so   (路径可能不太一样,参考make install 返回路径)
  2. 然后同样在php.ini文件中,将 zlib.output_compression = Off 改为 zlib.output_compression = On .

之后重启/etc/init.d/httpd restart

Installing Redmine3 项目管理工具Redmine安装

Installing Redmine3 项目管理工具Redmine安装In

stalling Redmine

This is the installation documentation for Redmine 1.4.0 and higher. You can still read the document for 1.3.x here.

Requirements

Operating system

Redmine should run on most Unix, Linux, MacMac Server and Windows systems as long as Ruby is available on this platform. See specific installation HowTos here.

Ruby interpreter

The required Ruby versions for a given Redmine version is:

Redmine version Supported Ruby versions Rails version used
current trunk ruby 1.9.3, 2.0.01, 2.1, 2.2 Rails 4.2
trunk < r13482 ruby 1.8.72, 1.9.2, 1.9.3, 2.0.01, 2.1, jruby-1.7.6 Rails 3.2
3.0 ruby 1.9.3, 2.0.01, 2.1, 2.2 Rails 4.2
2.6 ruby 1.8.72, 1.9.2, 1.9.3, 2.0.01, 2.1, jruby-1.7.6 Rails 3.2

Redmine 2.x does not support Ruby 2.2. Redmine 3.0 supports Ruby 2.2 (#18947).

MRI 1.9.3p327 contains a bug breaking plugin loading under Windows which 1.9.3p194 or 1.9.3p392 haven’t.

1 At time of writing (3/19/2013), SQL Server support is reported broken with ruby 2.0.0 under Windows because of a database adapter gem incompatibility

2 Ruby MRI 1.8.7 support has reached its EOL and its use is discouraged. See Important: Ruby 1.8.7 out of support and #14371 for additional information.

Supported database back-ends

  • MySQL 5.0 or higher

    • make sure to install the C bindings for Ruby that dramatically improve performance. You can get them by running gem install mysql2.
    • Redmine 2.x is not compatible with mysql 5.7.3 (#17460). Il will be supported by Redmine 3.
  • PostgreSQL 8.2 or higher

    • make sure your database datestyle is set to ISO (Postgresql default setting). You can set it using: ALTER DATABASE "redmine_db" SET datestyle="ISO,MDY";
    • some bugs in PostgreSQL 8.4.0 and 8.4.1 affect Redmine behavior (#4259#4314), they are fixed in PostgreSQL 8.4.2
  • Microsoft SQL Server

    • Redmine 2.x: 2008 or higher (since Redmine 2.3.0)
    • Redmine 3.x: 2012 or higher
  • SQLite 3 (not for multi-user production use!)

Optional components

  • SCM binaries (eg. svn), for repository browsing (must be available in your PATH). See RedmineRepositories for SCM compatibility and requirements.
  • ImageMagick (to enable Gantt export to PNG image and thumbnails generation).
  • Ruby OpenID Library (to enable OpenID support). Version 2 or greater is required.

Redmine Version

It is recommended that the majority of users install the proper point releases of redmine. Redmine currently releases a new version every 6 months, and these releases are considered very usable and stable. It is not recommended to install redmine from trunk, unless you are deeply familiar with Ruby on Rails and keep up with the changes – Trunk does break from time-to-time.

Installation procedure

Step 1 – Redmine application

Get the Redmine source code by either downloading a packaged release or checking out the code repository.

See the download page for details.

Step 2 – Create an empty database and accompanying user

Redmine database user will be named redmine hereafter but it can be changed to anything else.

MySQL

CREATE DATABASE redmine CHARACTER SET utf8; CREATE USER 'redmine'@'localhost' IDENTIFIED BY 'my_password'; GRANT ALL PRIVILEGES ON redmine.* TO 'redmine'@'localhost'; 

For versions of MySQL prior to 5.0.2 – skip the ‘create user’ step and instead:

GRANT ALL PRIVILEGES ON redmine.* TO 'redmine'@'localhost' IDENTIFIED BY 'my_password'; 

PostgreSQL

CREATE ROLE redmine LOGIN ENCRYPTED PASSWORD 'my_password' NOINHERIT VALID UNTIL 'infinity'; CREATE DATABASE redmine WITH ENCODING='UTF8' OWNER=redmine; 

SQL Server

The database, login and user can be created within SQL Server Management Studio with a few clicks.

If you prefer the command line option with SQLCMD, here’s some basic example:

Step 3 – Database connection configuration

Copy config/database.yml.example to config/database.yml and edit this file in order to configure your database settings for “production” environment.

Example for a MySQL database using ruby 1.8 or jruby:

production: adapter: mysql database: redmine host: localhost username: redmine password: my_password 

Example for a MySQL database using ruby 1.9 (adapter must be set to mysql2):

production: adapter: mysql2 database: redmine host: localhost username: redmine password: my_password 

If your server is not running on the standard port (3306), use this configuration instead:

production: adapter: mysql database: redmine host: localhost port: 3307 username: redmine password: my_password 

Example for a PostgreSQL database (default port):

production: adapter: postgresql database: <your_database_name> host: <postgres_host> username: <postgres_user> password: <postgres_user_password> encoding: utf8 schema_search_path: <database_schema> (default - public) 

Example for a SQL Server database (default host localhost, default port 1433):

production: adapter: sqlserver database: redmine username: redmine # should match the database user name password: redminepassword # should match the login password 

Step 4 – Dependencies installation

Redmine uses Bundler to manage gems dependencies.

You need to install Bundler first:

gem install bundler

Then you can install all the gems required by Redmine using the following command:

bundle install --without development test

Optional dependencies

RMagick (allows the use of ImageMagick to manipulate images for PDF and PNG export)

If ImageMagick is not installed on your system, you should skip the installation of the rmagick gem using:

bundle install --without development test rmagick

If you have trouble installing rmagick on Windows, refer to this HowTo.

Database adapters

Redmine automatically installs the adapter gems required by your database configuration by reading it from the config/database.yml file (eg. if you configured only a connection using the mysql2 adapter, then only the mysql2 gem will be installed).

Don’t forget to re-run bundle install --without development test ... after adding or removing adapters in the config/database.yml file!

Additional dependencies (Gemfile.local)

If you need to load gems that are not required by Redmine core (eg. Puma, fcgi), create a file named Gemfile.local at the root of your redmine directory. It will be loaded automatically when running bundle install.

Example:

# Gemfile.local
gem 'puma'

这里有提示,大致意思是说mysql-adapter有问题。 然后看了一下配置database.yml文件,确定adapter是mysql2,然后gem安装mysql2

$ gem install mysql2

Step 5 – Session store secret generation

This step generates a random key used by Rails to encode cookies storing session data thus preventing their tampering.
Generating a new secret token invalidates all existing sessions after restart.

  • with Redmine 1.4.x:
rake generate_session_store
  • with Redmine 2.x:
rake generate_secret_token

Step 6 – Database schema objects creation

Create the database structure, by running the following command under the application root directory:

RAILS_ENV=production rake db:migrate

Windows syntax:

set RAILS_ENV=production
rake db:migrate

It will create tables by running all migrations one by one then create the set of the permissions and the application administrator account, named admin.


Ubuntu troubleshooting:

If you get this error with Ubuntu:

Rake aborted!
no such file to load -- net/https

Then you need to install libopenssl-ruby1.8 just like this: apt-get install libopenssl-ruby1.8.

Step 7 – Database default data set

Insert default configuration data in database, by running the following command:

RAILS_ENV=production rake redmine:load_default_data

Redmine will prompt you for the data set language that should be loaded; you can also define the REDMINE_LANG environment variable before running the command to a value which will be automatically and silently picked up by the task.

E.g.:

Unices:

RAILS_ENV=production REDMINE_LANG=fr rake redmine:load_default_data

Windows:

set RAILS_ENV=production
set REDMINE_LANG=fr
rake redmine:load_default_data

Step 8 – File system permissions

NB: Windows users can skip this section.

The user account running the application must have write permission on the following subdirectories:

  1. files (storage of attachments)
  2. log (application log file production.log)
  3. tmp and tmp/pdf (create these ones if not present, used to generate PDF documents among other things)
  4. public/plugin_assets (assets of plugins)

E.g., assuming you run the application with a redmine user account:

mkdir -p tmp tmp/pdf public/plugin_assets
sudo chown -R redmine:redmine files log tmp public/plugin_assets
sudo chmod -R 755 files log tmp public/plugin_assets

Step 9 – Test the installation

Test the installation by running WEBrick web server:

  • with Redmine 1.4.x:
ruby script/server webrick -e production
  • with Redmine 2.x:
ruby script/rails server webrick -e production

Once WEBrick has started, point your browser to http://localhost:3000/. You should now see the application welcome page.

Note: Webrick is not suitable for production use, please only use webrick for testing that the installation up to this point is functional. Use one of the many other guides in this wiki to setup redmine to use either Passenger (aka mod_rails), FCGI or a Rack server (Unicorn, Thin, Puma, hellip;) to serve up your redmine.

Step 10 – Logging into the application

Use default administrator account to log in:

  • login: admin
  • password: admin

You can go to Administration menu and choose Settings to modify most of the application settings.

Configuration

Redmine settings are defined in a file named config/configuration.yml.

If you need to override default application settings, simply copy config/configuration.yml.example to config/configuration.yml and edit the new file; the file is well commented by itself, so you should have a look at it.

These settings may be defined per Rails environment (production/development/test).


Important

 : don’t forget to restart the application after any change.

Email / SMTP server settings

Email configuration is described in a dedicated page.

SCM settings

This configuration section allows you to:

  • override default commands names if the SCM binaries present in the PATH variable doesn’t use the standard name (Windows .bat/.cmd names won’t work)
  • specify the full path to the binary

Examples (with Subversion):

Command name override:

scm_subversion_command: "svn_replacement.exe"

Absolute path:

scm_subversion_command: "C:\Program Files\Subversion\bin\svn.exe"

Attachment storage settings

You can set a path where Redmine attachments will be stored which is different from the default ‘files’ directory of your Redmine instance using theattachments_storage_path setting.

Examples:

attachments_storage_path: /var/redmine/files
attachments_storage_path: D:/redmine/files

Logging configuration

Redmine defaults to a log level of :info, writing to the log subdirectory. Depending on site usage, this can be a lot of data so to avoid the contents of the logfile growing without bound, consider rotating them, either through a system utility like logrotate or via the config/additional_environment.rb file.

To use the latter, copy config/additional_environment.rb.example to config/additional_environment.rb and add the following lines. Note that the new logger defaults to a high log level and hence has to be explicitly set to info.

#Logger.new(PATH,NUM_FILES_TO_ROTATE,FILE_SIZE) config.logger = Logger.new('/path/to/logfile.log', 2, 1000000)
config.logger.level = Logger::INFO 

Backups

Redmine backups should include:

  • data (stored in your redmine database)
  • attachments (stored in the files directory of your Redmine install)

Here is a simple shell script that can be used for daily backups (assuming you’re using a mysql database):

# Database
/usr/bin/mysqldump -u <username> -p<password> <redmine_database> | gzip > /path/to/backup/db/redmine_`date +%y_%m_%d`.gz

# Attachments
rsync -a /path/to/redmine/files /path/to/backup/files

Notes on Linux/Unix installation

Be sure to disable security hardenning tools during the installation process if you run into bizarre permission problems. These problems are mostly silent and can be caused by tools like extended ACLs, SELinux, or AppArmor. There tools are mostly used in big companies with a strict security policy, default Linux/Unix distributions settings shouldn’t be a problem.

Notes on Windows installation

There is an prebuilt installer of Ruby MRI available from http://rubyinstaller.org.
After installing it, select Start Command Prompt with Ruby in the start menu.


Specifying the RAILS_ENV environment variable:

When running command as described in this guide, you have to set the RAILS_ENV environment variable using a separate command.

I.e. commands with the following syntaxes:

RAILS_ENV=production <any commmand>
<any commmand> RAILS_ENV=production

have to be turned into 2 subsequent commands:

set RAILS_ENV=production
<any commmand>


MySQL gem installation issue:

You may need to manually install the mysql gem using the following command:

gem install mysql

And in some case it is required to copy the libmysql.dll file in your ruby/bin directory.
Not all libmysql.dll are ok this seem to works http://instantrails.rubyforge.org/svn/trunk/InstantRails-win/InstantRails/mysql/bin/libmySQL.dll.

Important note for Win7 and later
On Win7 and later, localhost is commented out in the hosts file1 and IPV6 is the default2. As the mysql2 gem does no support IPV6 addresses3, a connection can’t be established and you get the error “Can't connect to MySQL server on 'localhost' (10061)“.
You can confirm this by pinging localhost, if ping targets “::1:” IPV6 is being used.


Workaround:


Replace localhost with 127.0.0.1 in database.yml.

1 http://serverfault.com/questions/4689/windows-7-localhost-name-resolution-is-handled-within-dns-itself-why

2 http://www.victor-ratajczyk.com/post/2012/02/25/mysql-fails-to-resolve-localhost-disable-ipv6-on-windows.aspx

3 https://github.com/brianmario/mysql2/issues/279

Alternative to manual installation

Some users may prefer to skip manual installation by using one of the third-party Redmine bundles on the download page.